In this article, we delve into the concept of Domain Name System (DNS), its crucial role in internet usage, particularly in the context of iPhones, and the relevance of DNS cache. We shed light on the need to occasionally ‘flush’ or ‘clear’ the DNS cache and how it can help alleviate browsing issues, ensure privacy, and troubleshoot network problems. A step-by-step guide to flushing DNS on iPhones and further troubleshooting tips provide an inclusive tutorial for enhancing your device’s performance.
What is DNS and Its Role in iPhone Usage
DNS, or Domain Name System, is often likened to the phone book of the internet. Just as you might look up a business’s name in a phone book to find its number, your computer uses DNS to turn human-readable URLs like www.google.com into IP addresses like 172.217.10.14, which it can use to route your traffic to the correct server.
Essentially, DNS plays an integral role in the way users interact with the internet, regardless of the device they’re using, including iPhones. Every time you browse the web, send an email, or stream media on your iPhone, DNS is working in the background to help facilitate these processes.
When you’re frequently accessing certain websites on your iPhone, the device will store or “cache” DNS information. This caching process allows your device to swiftly recall and load the web pages without having to perform a DNS lookup every time. This cache is referred to as the DNS cache. However, sometimes this cache might contain outdated or incorrect information, which could lead to issues loading certain websites.
In such scenarios, one might need to ‘clear DNS cache’ or ‘flush DNS’ on the iPhone to resolve the issue. Essentially, when you flush DNS or clear DNS cache on your iPhone, you’re getting rid of the stored information in the DNS cache. After the DNS cache is cleared, your iPhone will have to perform a fresh DNS lookup the next time you visit the website, ensuring that you are accessing the most up-to-date web page.
Why It’s Important to Flush DNS on iPhone
Flushing the DNS on your iPhone can help resolve several common browsing issues. Here are some reasons why it might be necessary:
- If a website has recently changed its IP address, your iPhone might try to access the outdated IP address saved in the DNS cache, leading to errors or delays. Flushing the DNS cache can solve this problem.
- Sometimes, malicious software might manipulate your DNS cache to redirect you to fraudulent websites. Clearing your DNS cache can help protect your device in such instances.
- If you’re experiencing slow loading times or network connection issues, clearing the DNS cache might help improve the browsing speed and performance.
It’s important to note that Apple’s iOS, the operating system that runs on iPhones, does not provide a native feature to manually clear the DNS cache. However, certain methods can indirectly help you flush DNS cache on your iPhone. These include switching to Airplane mode and back, restarting your iPhone, or resetting the network settings.
Understanding DNS and its importance in the everyday internet browsing experience, especially with regard to iPhone usage, helps users troubleshoot potential problems and enhance their device’s performance.
Why You Might Need to Flush DNS on iPhone
Most iPhone users rarely interact with the DNS (Domain Name System) settings. However, certain scenarios might necessitate the need to flush DNS on iPhone or clear the DNS cache. Flushing the DNS cache means deleting all the entries, which are essentially a record of all websites visited using your device. This action can help overcome some common challenges you may encounter while using your iPhone. Let’s explore some of these scenarios:
| ? Website Loading Issues | The DNS cache stores the IP addresses of recently visited websites. This storage aids in faster loading of these sites. However, if a website changes its IP address and your iPhone’s DNS cache still has the old IP, you may face issues loading the website. This situation calls for you to flush DNS on iOS. |
| ? Privacy Concerns | If you are concerned about privacy, you might want to clear the DNS cache on iPhone. This action deletes the record of all the websites you’ve visited, keeping your browsing history more private. |
| ?️ Network Troubleshooting | Network problems can sometimes be resolved by refreshing the DNS cache. If your iPhone is having trouble connecting to the internet, a good step in troubleshooting might be to flush the DNS cache. |
Besides these primary reasons, other scenarios like migrating to a new internet service provider or trying to avoid geographic restrictions could also necessitate the flushing of DNS cache.
It’s important to note that the process of flushing DNS cache differs depending on the device and the version of the operating system. However, for iPhone users, a common method to flush DNS or clear the DNS cache is by enabling Airplane mode for a few seconds or restarting the device. You can learn more about the DNS and its functions from this detailed guide on Cloudflare.
While flushing the DNS cache can resolve certain issues, it’s not always the first step you should take when troubleshooting. If you’re experiencing connectivity problems, it’s advisable to try other solutions like checking your network settings, resetting your network, or reaching out to your network provider before flushing the DNS cache. For an in-depth look at troubleshooting internet connection issues on your iPhone, refer to this guide from .
The Basics of DNS Flushing on iPhone: Step-by-Step Guide
If you’ve ever encountered issues with accessing certain websites or a sluggish internet connection on your iPhone, chances are it might be due to your DNS cache. Essentially, your device stores the locations of web servers that contain the pages you’ve recently visited. However, if these locations change before your iPhone updates its records, you may find difficulty accessing the sites. In such situations, you might need to flush your DNS cache, which essentially means clearing out the old addresses and making space for new ones. For an iPhone, you can do this by following the steps below:
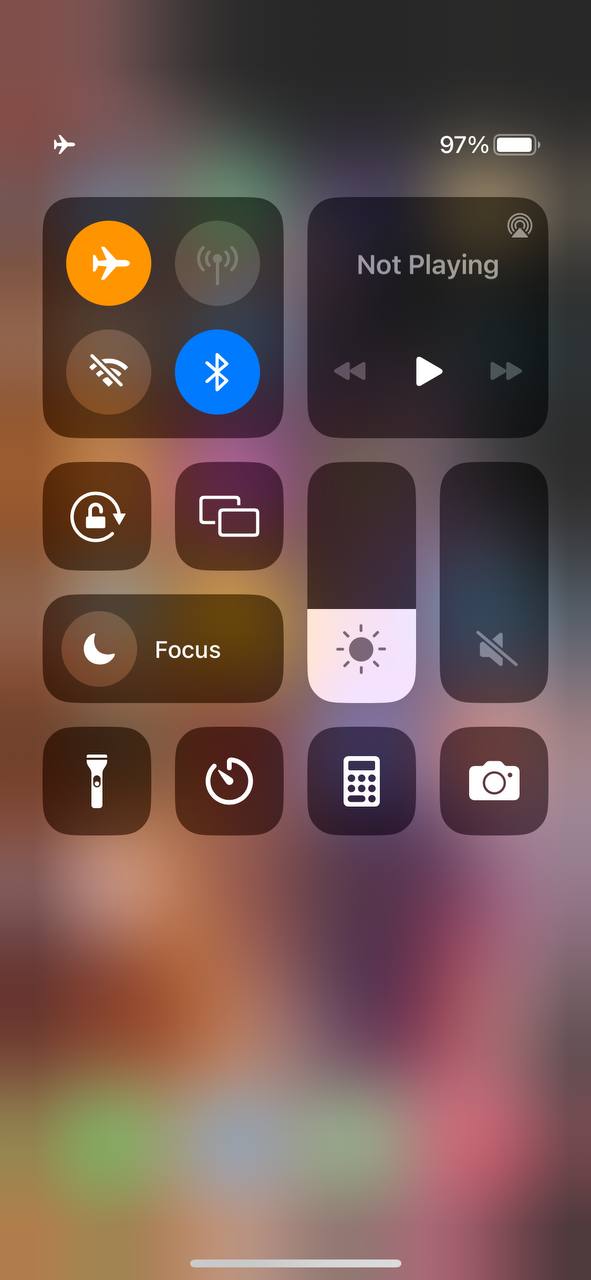
- Enable Airplane Mode: The first step to clear the DNS cache on your iPhone is to enable Airplane Mode. This disconnects your device from all network connections, which is a crucial part of the process. To do this, Swipe down from the upper right corner of the screen to access the Control Center, then select the Airplane mode icon.
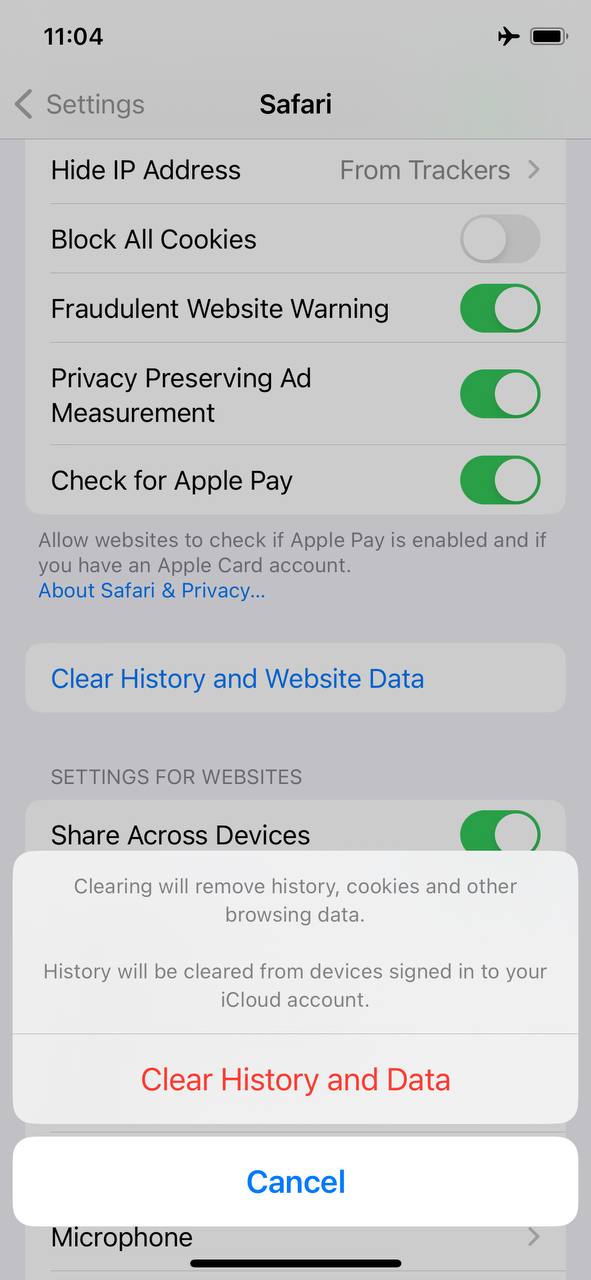
- Clear Safari History and Website Data: Next, you need to clear your Safari history and website data. This will erase your browsing history, cookies, and other browsing data. To clear your Safari history and website data, navigate to Settings > Safari > Clear History and Website Data, then tap on “Clear History and Data.” For more information on what this action does, you can visit Apple’s official support page.
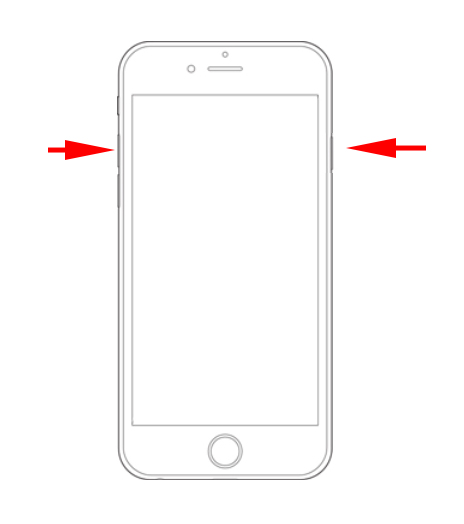
- Restart the iPhone: After clearing your Safari data, you need to restart your iPhone. By doing so, you ensure that the changes are fully implemented, thus effectively flushing the DNS cache. To do this, press and hold the side button and one of the volume buttons until the power-off slider appears. Then, drag the slider. Once your iPhone turns off, press and hold the side button again until you see the Apple logo.
- Disable Airplane Mode: Once your iPhone is back on, you can then disable Airplane Mode. Doing this will reconnect your iPhone to the internet, allowing it to start building a new DNS cache. Head back to Settings > Airplane Mode, then switch it off.
- Verify the DNS Cache is Cleared: After completing these steps, your iPhone’s DNS cache should be cleared. To verify, you can simply try accessing the websites you had trouble with previously. If you can now access them without any issues, you’ve successfully flushed the DNS cache on your iPhone. In some cases, the changes may not take effect immediately, so don’t worry if it doesn’t seem to work right away. This article from Lifewire explains more about what a DNS cache is and how it functions.
In conclusion, the process to flush DNS on an iPhone involves a few simple steps: enabling Airplane Mode, clearing Safari data, restarting your device, and finally, disabling Airplane Mode. If done correctly, this should help solve any issues related to accessing websites and improve your internet connection.
Troubleshooting DNS Issues on iPhone
If flushing the DNS cache on your iPhone doesn’t solve the issue, don’t fret. There are several other troubleshooting steps you can take to resolve this issue. Here are some options:
Option A: Check Your Wi-Fi Connection
Often, DNS issues can be linked to problems with your Wi-Fi connection. Start your troubleshooting by verifying the status of your internet connection.
- Try accessing different websites or apps to see if the issue is with a specific site.
- Attempt to connect another device to the same network to verify whether it’s a device or network problem.
- Restart your router or modem, or try connecting to a different Wi-Fi network if one is available.
You can find more detailed steps on how to troubleshoot your Wi-Fi connection on the Apple Support website.
Option B: Reset Network Settings
If checking the Wi-Fi connection doesn’t help, you might need to reset your network settings. This action will delete all network settings on your iPhone, returning them to factory defaults.
- Open Settings.
- Tap on General.
- Scroll down and tap on Transfer or Reset iPhone.
- Select Reset Network Settings. You might need to enter your passcode.
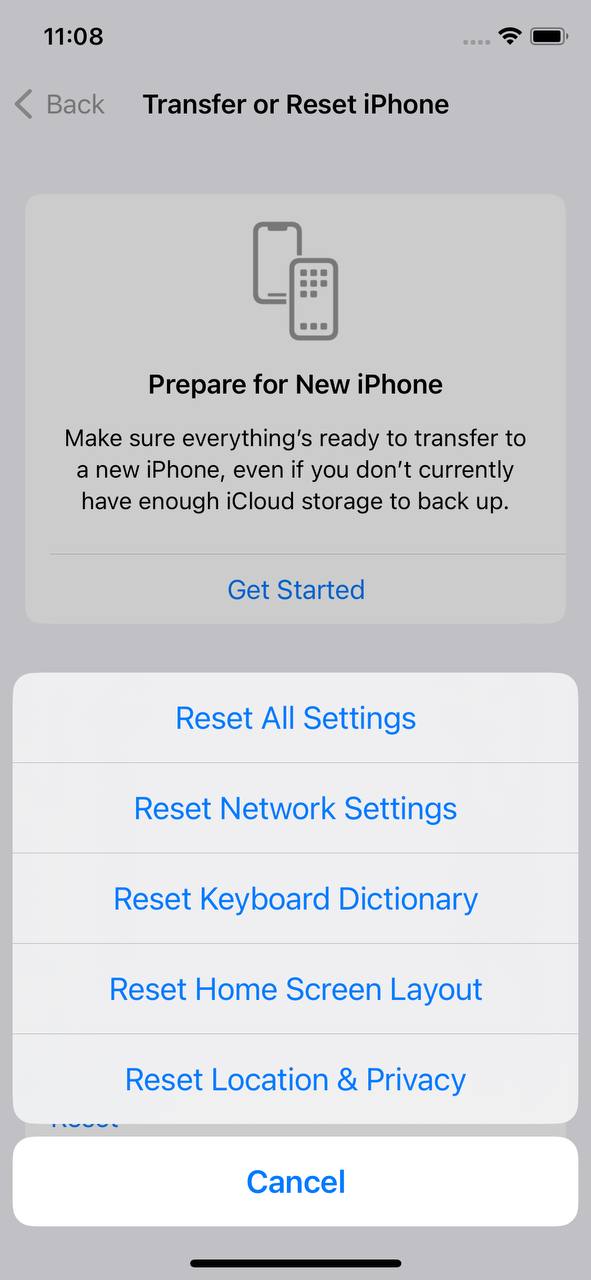
Note that this will also erase Wi-Fi networks and passwords, cellular settings, and VPN and APN settings you’ve used before. After the reset, you’ll need to re-enter your network information.
Option C: Update iOS Software
Keeping your iPhone updated is crucial. If you’re still experiencing DNS issues after trying the previous steps, make sure your iPhone’s software is up to date. Apple frequently releases iOS updates that include bug fixes and improvements that can resolve various issues, including DNS problems.
You can check for updates by going to Settings > General > Software Update. More detailed instructions can be found on the Apple Support website.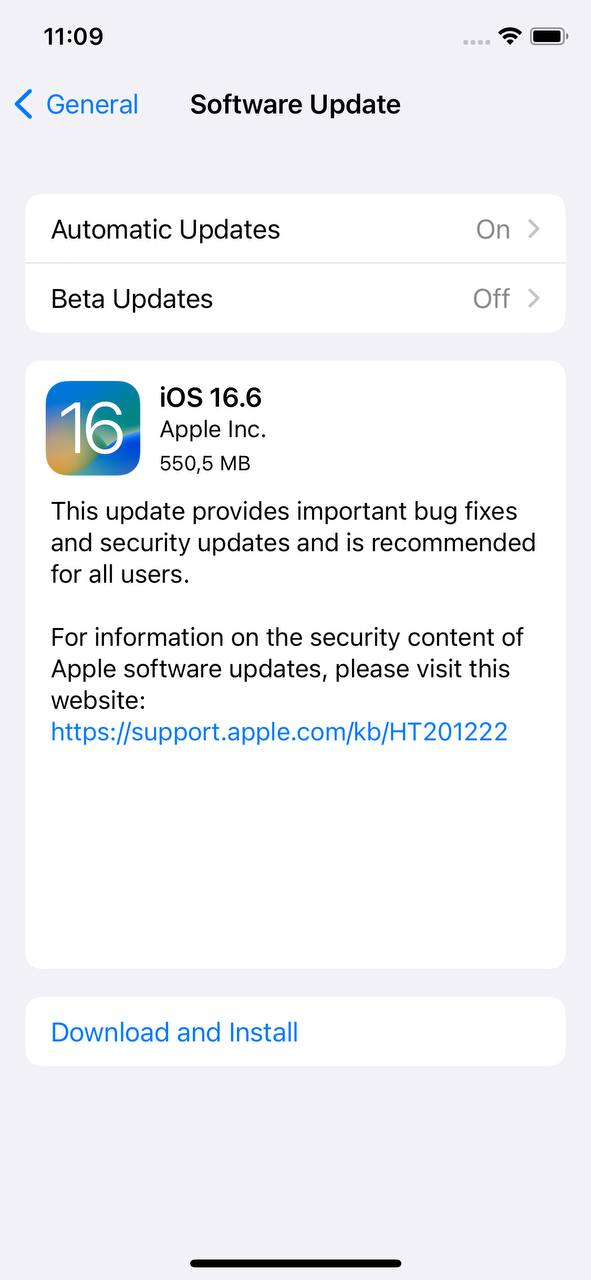
Option D: Contact Apple Support
If none of the above solutions resolve your DNS issue, it’s time to contact Apple Support. They have a team of experts who can provide further assistance. You can reach them through the Apple Support contact page.
It’s crucial to remember that DNS issues can originate from a variety of sources, not just your iPhone. Sometimes, the issue could be with your internet service provider, the specific website you’re trying to access, or even a broader internet problem. Therefore, it’s good to try accessing the site from another device or network to verify where the problem lies.
Keep in mind that steps like flushing DNS on iPhone or clearing DNS cache on iOS could help in many situations, but they are not a universal solution. The troubleshooting steps provided here should help you navigate and potentially resolve the issues you are facing.
Preventive Measures and Maintenance Tips: Keeping Your DNS Healthy
One of the integral parts of any networking system, the Domain Name System (DNS), can occasionally run into issues that hinder its performance. As an iPhone user, these issues may manifest as slow internet speeds or even lack of access to some websites. Therefore, keeping your DNS system healthy becomes crucial. This can be achieved through a series of preventive measures and maintenance actions such as regular restarts, keeping your iOS software updated, and using reliable DNS servers.
Regular Restarts
Periodic restarting of your iPhone helps to clear out temporary cache files, including the DNS cache. These files, when accumulated, can potentially slow down your device’s performance. Therefore, a regular restart can function as a simple yet effective ‘flush DNS iPhone’ measure. Just power off your device and turn it on again to perform this operation.
Software Updates
Another crucial preventive measure is keeping your iOS software updated. not only to introduce new features but also to fix any bugs or issues from previous versions. These updates may also include security enhancements that can protect your DNS settings. Thus, for efficient DNS cache iPhone maintenance, always ensure your device is running the latest version of iOS.
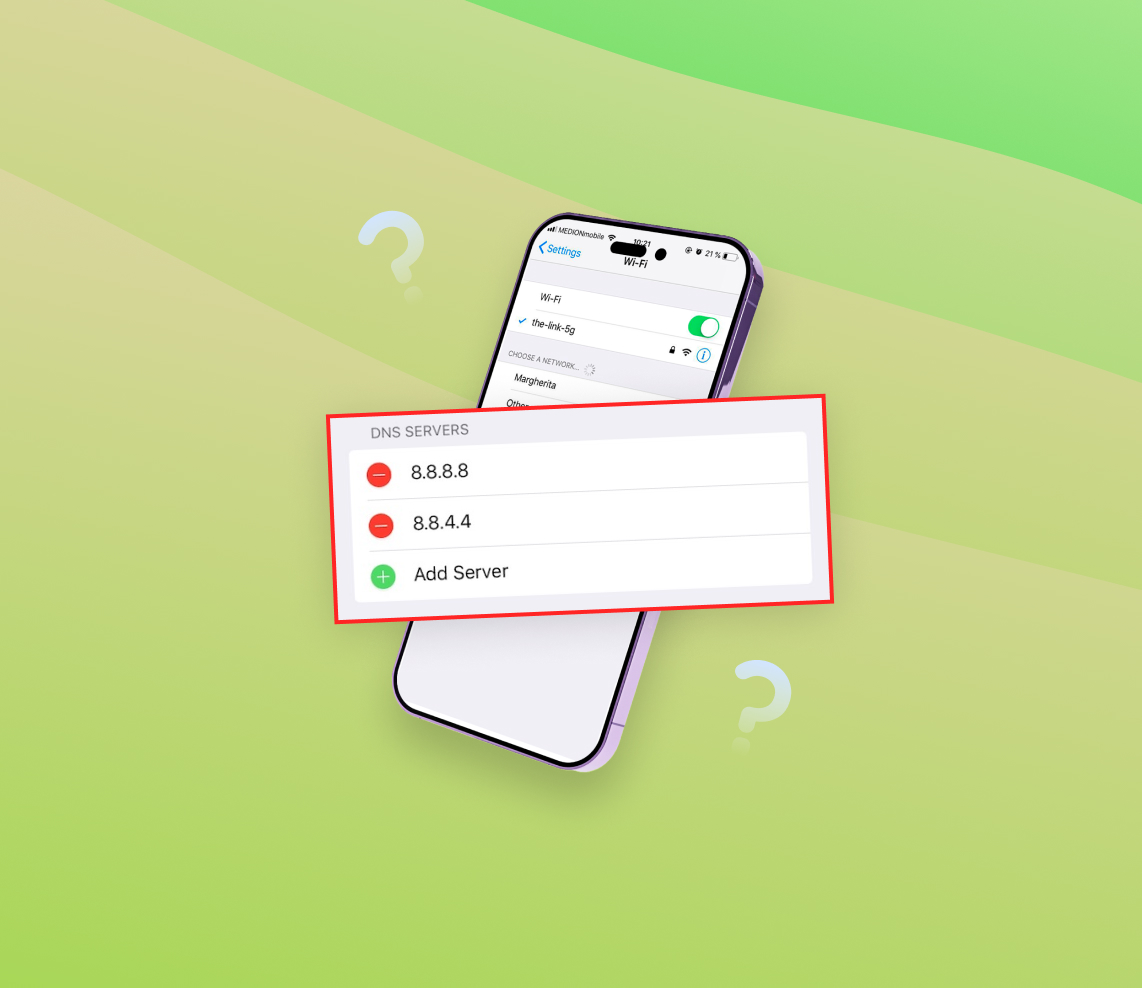
Using Reliable DNS Servers
Lastly, the use of reliable DNS servers is an important maintenance tip. When your device connects to the internet, it communicates with these servers to convert domain names into IP addresses. Using reliable and fast DNS servers can significantly improve your internet experience. Not all servers perform equally, so it’s beneficial to consider alternatives such as Google DNS or OpenDNS.
Tips for Clearing DNS Cache
Although there’s no direct ‘iOS flush DNS’ or ‘clear DNS iPhone’ option in the system settings, various workarounds can help you achieve the same result. These include switching to Airplane mode and back, restarting your device, and changing DNS settings. These are not only measures to resolve existing DNS issues, but they also serve as preventive actions that can contribute to maintaining a healthy DNS system on your iPhone.
Keeping your DNS system well-maintained and regularly clearing your DNS cache can significantly improve your iPhone’s internet performance and protect your device from potential DNS-related issues. Understanding these preventive measures and maintenance tips can help you make the most of your iPhone’s networking capabilities.
Conclusion
In essence, the Domain Name System (DNS) and its cache play a vital part in ensuring smooth internet usage on your iPhone. Flushing the DNS cache or clearing it can resolve common browsing issues, reinforce privacy, and aid in network troubleshooting. Despite the lack of a native feature to manually clear the DNS cache in iOS, effective methods like toggling Airplane mode, device restarting, or network settings reset can help achieve this. Being aware of these techniques and the scenarios that may call for DNS flushing can enhance your iPhone usage experience. Also, regular preventive measures like system restarts and keeping your iOS software updated contribute to the health and efficiency of your DNS system.
FAQ
Changing DNS settings on your iPhone can have several effects. It can speed up your internet connection, bypass internet censorship, enhance privacy, and improve reliability. This is because DNS (Domain Name System) is like the phonebook of the internet, converting human-friendly website names into IP addresses that computers can understand.
The storage duration of DNS cache can vary depending on the Time to Live (TTL) value of the DNS records, set by the administrator of the DNS server. It can range from a few minutes to days. However, if needed, DNS cache can be manually cleared or “flushed”.
The frequency of DNS flushing depends on your needs. There isn’t a set schedule that suits everyone. Generally, you may need to flush your DNS if you are facing difficulties accessing certain websites, if you’re experiencing slow internet connections, or if you’ve changed your DNS settings.
Yes, it’s safe to flush your DNS. Flushing the DNS cache removes all the information stored in the cache, forcing your computer to find the newest information about a website. This can help resolve issues with accessing certain sites or internet speed problems. It doesn’t harm your device or personal data.