In today’s digital age, personal devices like iPhones are not just communication tools but repositories of our private lives. This insightful article highlights the critical importance of thoroughly erasing all data from your iPhone before parting with it, whether for upgrading or selling. The piece emphasizes that it’s not just about transferring ownership of a device; it’s fundamentally about protecting the intimate details of your life, showcasing a proactive step in personal cybersecurity.
Precautions Before You Erase Data on iPhone
When the moment arises to part with your iPhone, either through selling or upgrading, it’s essential to understand that you’re not just passing on a device, but also the wealth of personal data it stores. From private conversations and photos to financial information, your iPhone is a treasure chest of personal details. Let’s delve into why erasing your iPhone data is so crucial and the steps you need to take before doing so.
Why Erasing iPhone Data is Critical
Think of your iPhone as a digital diary of your life; it knows more about you than you may realize. If this diary gets into the wrong hands without a proper data wipe, consequences can range from embarrassing privacy leaks to devastating identity theft. Erasing all data from your iPhone isn’t just a step in the process of handing it over; it’s a crucial measure to secure your digital life.
Pre-Erase Checklist
Before you hit that “erase all content” option, there’s a checklist you need to tick off. It’s not just about making sure you don’t lose important data; it’s also about ensuring your digital footprints are not traceable by the next owner. Here’s a handy table, complete with emojis for added clarity:
| ? Backup Your Data | Ensure you’ve backed up everything via iCloud, your computer, or another service. It’s your digital safety net, so you don’t lose any precious data when you erase everything from your old iPhone. |
| ? Logout of All Services | Whether it’s iCloud, iTunes, the App Store, or your email accounts, log out of them all. This step ensures the new owner can’t impersonate you or make any purchases using your accounts. |
| ? Prepare Your Account Passwords | Post-erasure, you’ll need your passwords to get back into your accounts on a new device. Keep them handy or use a password manager to ensure you’re not locked out after you remove personal data from your iPhone. |
| ? Unpair and Disable Services | Unpair any devices like your Apple Watch and disable ‘Find My iPhone’. These services are tied to your personal details and should be disconnected before the new owner powers on. |
| ? Consult with Your Carrier | Reach out to your carrier to check if there are additional steps or clearance needed before you sell your device, ensuring it’s not locked and is free of ties to your carrier account. |
Completing these tasks doesn’t just prepare your device for its new owner; it protects your digital identity. Erasing your iPhone data should be done thoughtfully and thoroughly — because your digital privacy is priceless.
How to Erase Data on iPhone: Step-by-Step Guide
Once you’ve taken all the necessary precautions to secure your data and prepare your iPhone for a factory reset, it’s time to erase all content from the iPhone. This process will return your phone to its original factory settings, just like it was when you first took it out of the box. Below, you’ll find a detailed guide to help you through each step of this process, ensuring you don’t overlook anything important and leave your personal data protected.
Before you begin, ensure you’ve completed all the steps mentioned in the previous section. You’ll need your Apple ID password and a bit of time — the process can take a few minutes to a couple of hours, depending on the amount of data on your iPhone.
Step-by-Step Process to Erase Your iPhone
- Transfer or backup your data: If you haven’t already, back up your iPhone. Apple provides a comprehensive guide on how to back up your iPhone, ensuring you don’t lose any precious data.
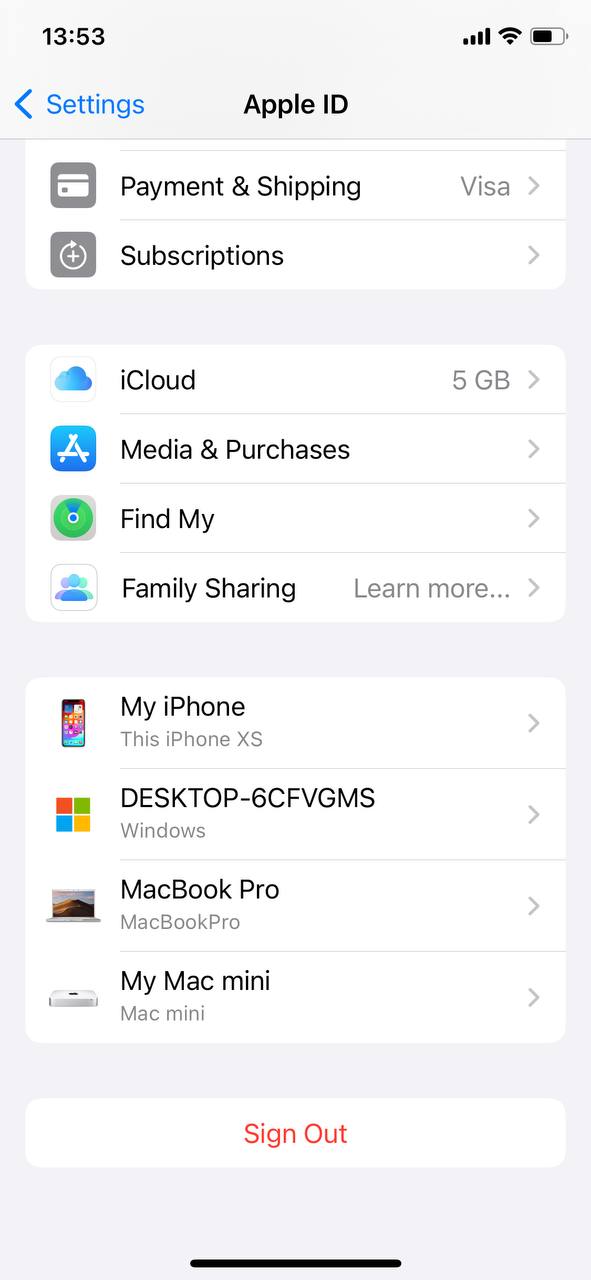
- Sign out of services: Make sure you’re signed out of iTunes, iCloud, and the App Store. If your device uses iOS 10.3 or later, tap Settings > [your name]. Scroll down and tap “Sign Out”. For iOS 10.2 or earlier, tap Settings > iCloud > Sign Out, then tap “Sign Out” again, then Settings > iTunes & App Store > Apple ID > Sign Out.
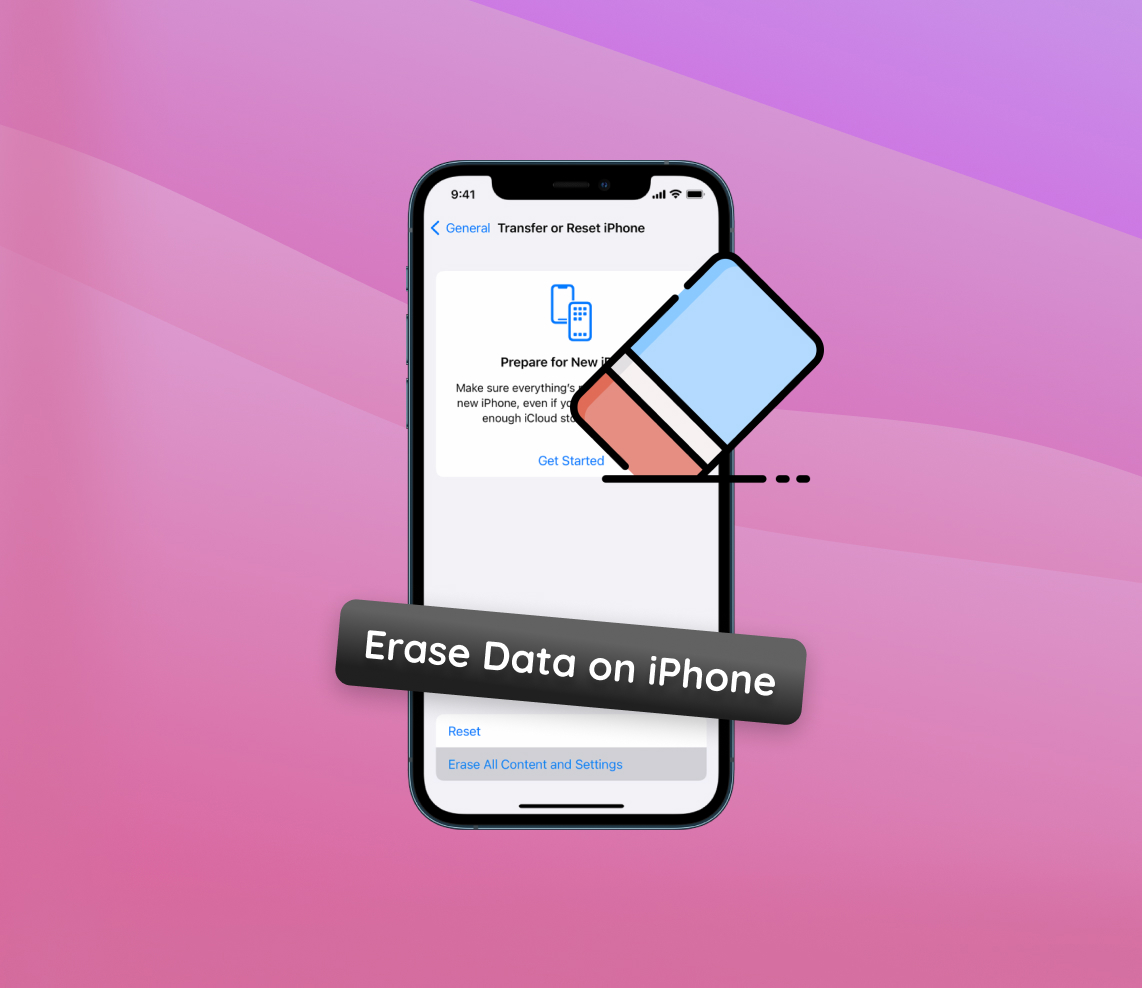
- Start the erasing process: Go to Settings > General > Reset. Then tap “Erase All Content and Settings.” You might need to enter your passcode or Apple ID password before the process commences.

- Wait for completion: The device will restart and begin the process to delete data from the old iPhone. This might take some time, so make sure your device is charged or plugged in to prevent power loss during the process.
- Set up as new or restore from a backup: Once the process is complete, you’ll have a clean slate. You can now set up your iPhone as new, restore it from a different backup, or sell it with confidence, knowing your data is no longer present on the device.
By following this guide, you ensure the complete removal of your personal data from your iPhone, prepping it for a fresh start with a new owner or simply clearing your iPhone memory before selling. Remember, taking the time to properly erase your iPhone is an investment in your privacy and security.
Special Considerations for Selling or Giving Away Your iPhone
Before handing over your iPhone to a new owner, there are several crucial steps to follow, ensuring your personal data is secure and that the device is ready for a fresh start. Here’s a comprehensive checklist that acts as your roadmap through this process:
| ? Remove Personal Associations |
|
| ? Disable Services and Features |
|
| ?️ Final Cleanup |
|
Executing these steps ensures that you’re not just erasing your iPhone’s data but also protecting your digital identity while making the device pristine for its next owner. Treat this checklist as your safety net when you decide it’s time to part ways with your iPhone.
What to Do If You’ve Already Sold Your Old iPhone?
Panic is often the first reaction when you realize you’ve sold or given away your iPhone without properly erasing your personal data. However, immediate and informed actions can help mitigate potential risks. Here’s what you can do to safeguard your information remotely:
Use iCloud to Your Advantage
If your iPhone was linked to your iCloud account, you could still take measures to protect your data remotely:
- Remote Wipe: If you had ‘Find My iPhone’ enabled, use the iCloud website to remotely erase all content from your old iPhone. Sign in with your Apple ID, click on “All Devices,” select the sold iPhone, and choose “Erase iPhone.” This will delete all data on the device, though it requires the iPhone to be connected to the internet.
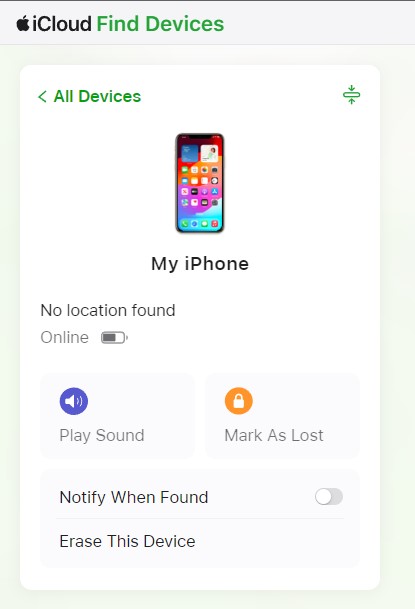
- Remove from Account: After the remote wipe, or if you can’t perform one, remove the device from your iCloud account. On the same page, instead of selecting “Erase iPhone,” choose “Remove from Account” to ensure the new owner can’t activate it with your Apple ID.
Change Passwords for Linked Accounts
Irrespective of whether you can perform a remote wipe, immediately change the passwords for all accounts you were logged into on the sold device:
- Email Accounts: Your email is a gateway to reset passwords for many of your other accounts. Prioritize this first.
- Social Media and Other Apps: From Facebook to your favorite shopping app, change these passwords to prevent unauthorized access.
- Apple ID: Change your Apple ID password to prevent the new owner from potentially accessing your iTunes, iCloud, and other Apple services. Visit your Apple ID account page to do this.
Remember, these steps are reactive measures. The best way to protect your privacy is proactive by ensuring you remove all information from your iPhone before parting with it. However, if you’re past that point, these actions can help secure your digital privacy and peace of mind.
Conclusion
In conclusion, the necessity of erasing your iPhone’s data transcends the simple act of deleting files; it’s a vital measure in the ongoing effort to protect one’s digital identity. In an environment where data breaches and identity theft are rampant, neglecting this step could have dire consequences, ranging from the unsettling exposure of personal life to severe financial repercussions. This article doesn’t just advise a thorough cleanse of your digital footprint on your iPhone; it underscores the responsibility that comes with the possession of such powerful technology. By following the guidance provided, readers can ensure they’re not just casually discarding a device, but are consciously severing ties with a digital extension of themselves, thus preserving their privacy and peace of mind in this hyper-connected world.
FAQ
Understanding the distinction between these two options is crucial. Resetting your iPhone generally refers to a soft reset or a force restart – similar to turning your phone off and on – which doesn’t affect data. However, the “erase all content and settings” option is more drastic. This removes all personal data and customized settings, returning the iPhone to its factory default condition.
No, simply resetting the iPhone, such as a forced restart or a soft reset, doesn’t delete your data or settings. It merely resolves minor software glitches. To completely remove your personal data, you need to select the “Erase All Content and Settings” option, which restores the device to its original factory settings.
Eradicating all content and settings from your iPhone deletes information only from the device, not the iCloud. Thus, your data stored in iCloud remains intact. However, before performing this action, ensure you’ve backed up all necessary data, as anything not stored in iCloud or another backup will be irretrievably lost from the iPhone.
Using the ‘Find My iPhone’ feature from another device allows you to remotely wipe the iPhone, which is particularly useful if it’s lost or stolen. This action will erase all of your personal data to protect your privacy, but it won’t remove Activation Lock, ensuring the device isn’t usable by a new owner until it’s removed with your Apple ID and password.
Generally, once you’ve chosen to erase your iPhone’s data, it’s permanently deleted. However, if you’ve backed up your phone to iCloud or iTunes before the erasure, you can restore your device from that backup. Be aware that professional data recovery services might, in some instances, retrieve data, but there’s no guarantee, and it often involves complex procedures.