With the growing ubiquity of iPhones, the necessity to ensure data safety has never been more paramount. This article delves into the reasons why iPhone users might feel compelled to permanently delete their data, and why simply pressing the ‘delete’ button might not suffice. From resale considerations to cyber threats, explore the intricate nuances of iPhone data management.
Why People Seek to Delete Data From iPhone Permanently
Every iPhone user, at some point in their tech journey, may feel the need to permanently delete data from their device. While the motives can range from reselling to simply ensuring personal data safety, it’s crucial to understand that merely hitting the ‘delete’ button might not be enough.
When you decide to resell, recycle, or gift your iPhone to someone else, you must be certain that the new user won’t retrieve your old data, intentionally or otherwise. Beyond the risk of personal embarrassment, there are severe implications tied to data breaches, identity theft, and potential cyber threats. In light of this, let’s explore why many seek to permanently delete files on iPhone rather than just erasing them.
Common Scenarios for Permanent Data Deletion
| Scenario | Description |
| ? Reselling the Device | When selling your iPhone, ensuring that the new owner doesn’t get access to your pictures, apps, notes, and other private data is essential. A simple factory reset might not permanently delete iPhone data, leaving fragments that can be retrieved with specialized software. |
| ♻️ Recycling or Disposal | E-waste is a growing concern, and as responsible citizens, many choose to recycle their old gadgets. But before you do, it’s crucial to delete data from iPhone permanently to prevent any unauthorized access. |
| ? Gifting | Handing down your device to a family member or friend? Wipe iPhone data entirely to offer them a fresh start and to keep your personal details safe. |
| ?️ Protection Against Cyber Threats | With the rise in cybercrimes, your deleted files might become a gateway for hackers. Even if you aren’t giving away your iPhone, it’s a good practice to permanently delete files from iPhone that are sensitive or no longer needed. |
Regular Deletion Vs. Permanent Deletion
On the surface, when you delete a file or photo on your iPhone, it seems to vanish. But that’s not the complete truth. Regular deletion often means that the data is simply marked as ‘free space’ and can be overwritten. Until then, with the right tools, this data can be retrieved. Experts have shown how easy it is to recover files that aren’t deleted securely. This is why to truly ensure your data’s safety, especially when considering potential data breaches or reselling the device, you should aim to permanently delete data from iPhone.
In conclusion, as technology evolves, so do the methods to exploit it. Ensuring you permanently delete files on iPhone not only safeguards your personal information but also promotes a safer digital environment for everyone.
How to Permanently Delete Files and Apps on iPhone: Step-by-Step Guide
Every iPhone user knows the simplicity of deleting apps or files: a tap on the trash icon, and it’s gone. However, to ensure that certain files or apps are permanently deleted from iPhone, a more thorough process is required. Let’s dive into the steps to make sure your selected data is entirely removed without any residues.
1. Backup Important Data
Although we’re focusing on specific files and apps, it’s always safe to backup your iPhone. You can use iCloud or iTunes for this purpose. Having a backup ensures you can retrieve data if something unintended gets deleted. Here’s a guide on how to backup your iPhone using iCloud.
2. Deleting Specific Photos and Videos
To permanently delete files from iPhone:
- Open the Photos app.
- Select the photos and videos you wish to delete.

- Tap on the trash icon and confirm deletion.
- Go to Albums > Recently Deleted.

- Select the photos and videos again and choose ‘Delete All’ to remove them permanently.
3. Removing Apps and Their Data
When you want to permanently delete apps and their associated data:
- Long press the app icon until a dropdown menu appears.
- Select Remove App > Delete App.
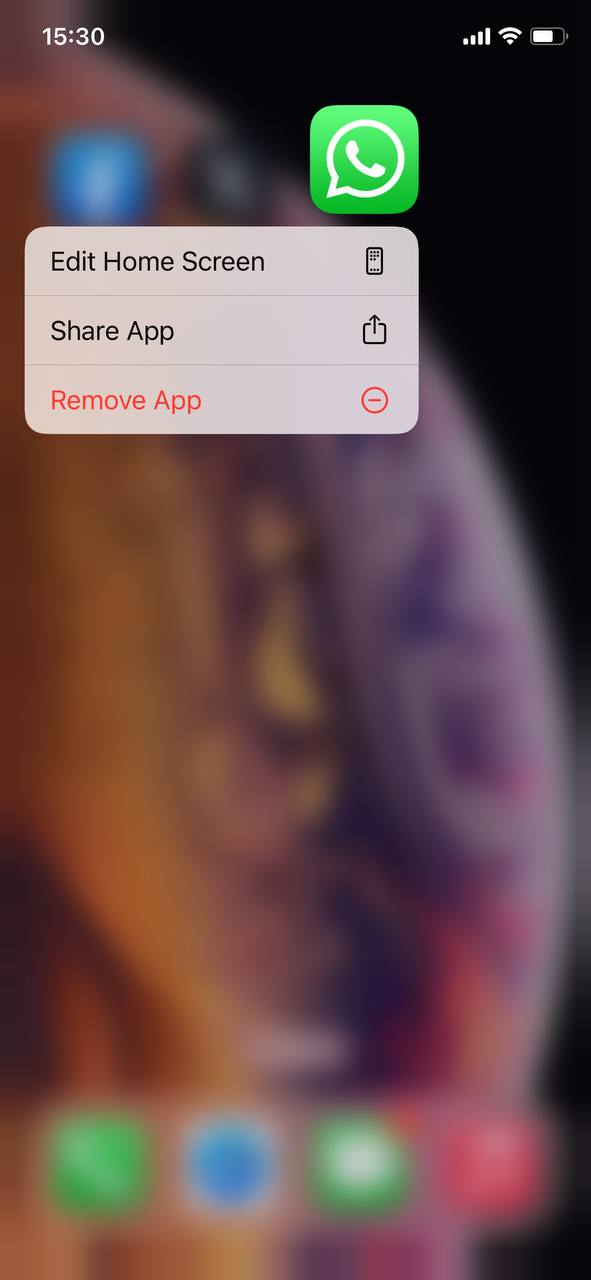
- Confirm the deletion.
- For added assurance, go to Settings > General > iPhone Storage.
- Find the app in the list and tap on it, then choose ‘Delete App’.
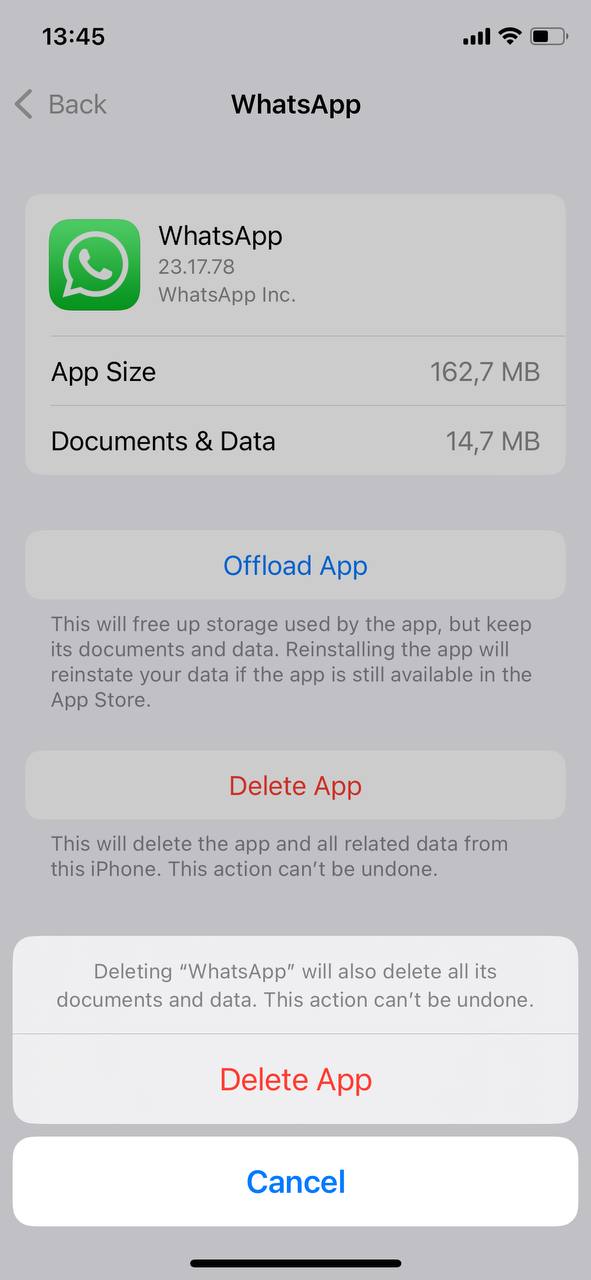
This ensures that the app and all its residual data are completely removed from your iPhone.
4. Erasing Files from Third-Party Apps
If you use third-party apps like document editors or note-taking apps, ensure you delete sensitive files from within these apps and also clear them from any ‘recently deleted’ or ‘trash’ folders in the app.
5. Securely Delete Data from Messaging Apps
For apps like iMessage, WhatsApp, or Telegram:
- Open the respective messaging app.
- Find the chat containing sensitive data.
- Delete specific messages or the entire chat.
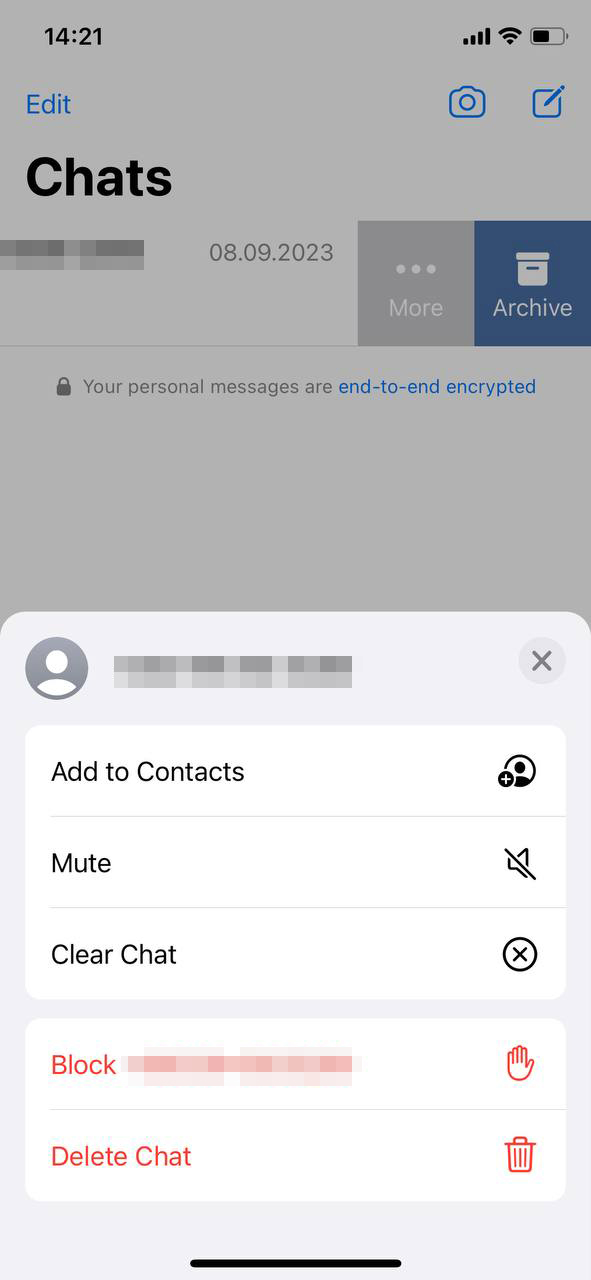
- For added measure, visit the app’s settings and clear caches or backup data if available.
In conclusion, while the iPhone’s user-friendly design makes deleting data seem straightforward, ensuring the complete and permanent removal of specific files and apps requires a tad more attention to detail. Always remember to review your ‘Recently Deleted’ folders and double-check to maintain your digital privacy.
Additional Methods to Permanently Delete Files From iPhone
While the iPhone provides built-in features to delete files and apps, sometimes users seek extra layers of assurance. Enter third-party software solutions. These tools can aid in the process of permanently deleting files from iPhone, ensuring that the data is irretrievable, even with advanced recovery tools. Below, we’ll explore some reputable third-party solutions and their standout features.
Dr.Fone – Data Eraser (iOS)
Dr.Fone offers a comprehensive data eraser tool for iOS devices. It’s designed to wipe your iPhone clean of any data, ensuring privacy:
- Complete iOS device cleanup.
- Erases deleted files to ensure they’re unrecoverable.
- Space freeing capability by removing junk files.
- User-friendly interface with step-by-step guides.
Process:
- Connect your iPhone to your PC or Mac.
- Open Dr.Fone and select ‘Data Eraser’.
- Follow the on-screen instructions to permanently delete files on iPhone.
More about Dr.Fone can be found on their official website.
iMobie PhoneClean
iMobie PhoneClean is another tool to consider when looking to delete data from iPhone permanently. Its features encompass more than just data deletion:
- Intensive cleanup for private data.
- Removes sensitive data like messages, call history, and more.
- Clears internet history and webmail caches for added privacy.
- Advanced file scanning algorithms to find hidden junk.
Process:
- Install PhoneClean on your computer.
- Connect your iPhone using a USB cable.
- Select the desired cleanup mode and initiate the cleaning process.
Learn more about iMobie PhoneClean on their official site.
In conclusion, while iPhones come equipped with substantial data deletion features, third-party tools add another layer of surety. Opt for these solutions when looking to ensure that your digital footprints are completely erased, safeguarding your personal and sensitive data from potential misuse.
Conclusion
In an age where personal data is both a treasure and a target, ensuring its complete erasure from devices like iPhones is crucial. Whether you’re considering reselling your device, gifting it, or merely aiming for personal data security, understanding the importance of permanent deletion is essential. Not only does it guard against potential cyber threats and identity theft, but it also provides peace of mind. Always prioritize your data’s safety, and stay informed about the best practices for device management.
FAQ
A factory reset, also known as a hard reset or master reset, returns the iPhone to its original settings, essentially making it like a new device. While this process removes all data, settings, and apps from the iPhone, it is important to note that the data may still be recoverable using specialized software tools. To ensure permanent data deletion, users should enable the ‘Encrypt iPhone backup’ option in iTunes before performing a factory reset. Additionally, it’s a good idea to overwrite the free space on the device multiple times and consider utilizing secure data deletion tools.
Yes, in many cases, erased iPhone data can be recovered unless specific measures are taken to overwrite it. When you delete data from your iPhone, it’s not immediately removed. Instead, the space that was occupied by the deleted data is marked as available for new data. Until new data overwrites that space, the deleted files can potentially be recovered using specialized software.
Apple does not have a built-in service to recover permanently deleted files from an individual device. However, if you’ve backed up your device to iCloud or iTunes, you may be able to restore your data from those backups. It’s crucial to understand that once data is overwritten or if no backups exist, the chances of recovery diminish significantly.
If you use the “Erase All Content and Settings” option on your iPhone or erase it remotely using “Find My iPhone,” all your personal data will be deleted. Additionally, Activation Lock will be turned on, which prevents anyone else from activating and using your iPhone without your Apple ID and password. This feature acts as a deterrent against theft. However, if you’ve removed the device from your Apple ID account or didn’t have Activation Lock turned on, then someone else could potentially use and set up the iPhone as their own. Always ensure Activation Lock is enabled before erasing your iPhone to protect your privacy.